
Ever since telnet client is not enabled by default in Windows Server 2008(also in 2012 and 2016), SysAdmins has tough time using telnet command when they need it. In this post, let us see what are the options for us to telnet without using actual telnet.exe
We have two options when there is no telnet.exe command.
- Using .Net classes to perform the telnet
- Using Test-NetConnection cmdlet (available from Windows Server 2012 onward)
Using .Net Classes to perform the telnet
The System.Net.Sockets.TCPClient class provides facility to perform telnet operation to remote host on specified port. I have posted about this in past with the title Test Port Connectivity using PowerShell. This article has a function which you can import into your shell and use it to perform the telnet operation.
This method works for all versions of windows operating systems as it is using underlying .Net Module.
Using Test-NetConnection cmdlet
Starting Windows Server 2012, Microsoft has provided a inbuilt function for this purpose. It is called Test-NetConnection. This function can be used to perform telnet, traceroute and many other operations. In this post I will limit the discussion to telnet functionality.
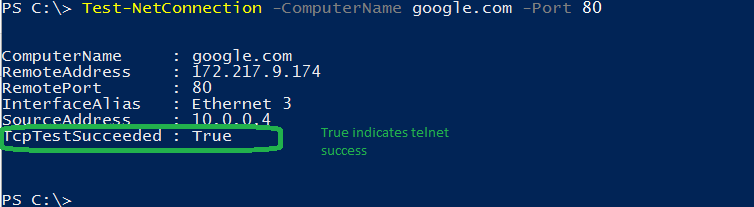
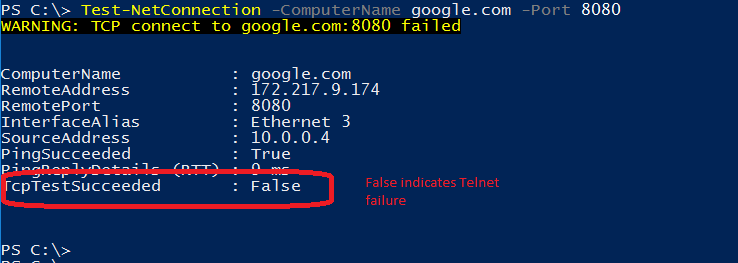
To telnet to a port on remote computer you have to use –ComputerName and –Port parameters of this function. For example, if you want to check if google.com is responding on port 80, then use below command.
Test-NetConnection -ComputerName google.com -Port 80
After completing the execution, it returns an object which will tell you the output of the telnet. The TCPTestSucceeded value will be True if the telnet is successful and will be False if the telnet has failed.
Look at the below screenshots for understanding this.
Telnet Successful:
Telnet Failure:
As mentioned before this works on Windows Server 2012 or above only. If you need same thing for previous versions you need to use the first approach that I mentioned.
Hope this helps.