≡ Menu

Today I got a requirement to find out the list of Citrix XenApp Servers where a application is published. All I have is the name of the published application. Though I have been using powershell for a while now, I never tried it in Citrix environment. I took me some time to figure out the Add-Ins, modules required for querying the XenApp6 environment.  After familiarizing with XenApp powershell commands, I realized there is lot I can do with it in XenApp environment. And it is faster than GUI.

So, here is the script I am talking about which takes application name as parameter and displays the XenApp servers where it is published, Accounts that have access to it, path of the application, Type of the application(streamed/serverInstalled), Executable path and many more details.

Note that you need to download and install Citrix XenApp 6 Powershell SDK to get the required SnapIns. This is not required if you are running the script from a XenApp server since it already contains the required Powershell SDK installation.

function Get-CitrixPublishedApplicationDetails {
[cmdletbinding()]
param(
[string]$AppName
)            

Add-PsSnapIn Citrix*
Get-XAApplicationReport -BrowserName $AppName | Select DisplayName, ServerNames, Accounts, ApplicationType, ClientFolder, CommandlineExecutable            

}

Usage:

Get-CitrixPublishedApplicationDetails -AppName Notepad

Hope this helps…

[update]

There is another way available as well which returns the list of XenApp Servers on which a given application is hosted.

Get-XAServer -BrowserName Notepad | select ServerName


{ 1 comment }

I get the below error sometimes while working with powershell scripts. Every time I end up spending some efforts to recollect what I have done previously to fix this. This time I decided to document it for my quick reference and for other powershell users.

ERROR Message:

Unexpected attribute ‘cmdletbinding’.
At line:24 char:15
+ [cmdletbinding <<<< ()] + CategoryInfo : ParserError: (:) [], ParentContainsErrorRecordException + FullyQualifiedErrorId : UnexpectedAttribute

When we will get this error?

This error we will generally observe when copy pasting a function from script to powershell console for quick execution. It is also quite possible that you might get this error while running some script or importing a function.

What are the causes for this error?

Mainly there are two cases where you will get this error.

Missing of param declaration:

We declare [cmdletbinding()] in a function or script but may miss to declare parameters after that. It is possible that your script/function doesn’t requires any parameters but you still need to declare it like param ( ). Otherwise you will get the above error.

So, it is general thump rule that [cmdletbinding()] should follow param() like below.

            
function foo-bar {            
[cmdletbinding()]            
param (            
)            
...            
...            
...            
}

A new line between [cmdletbinding()] and param declaration:

Just try copy pasting the below code into a powershell window and let me know what happens. You will definitely observe the above given error. This is because of the new line between [cmdletbinding()] and param declaration. Now remove the new line and try again. It should go well.

            
function foo-bar {            
[cmdletbinding()]            

param (            
)            
...            
...            
...            
}

Note that above is true while copy pasting the code into powershell window. If you have this space in a script and you are executing the script from powershell window, then you may not notice this.

Hope this helps… Happy learning…


{ 2 comments }

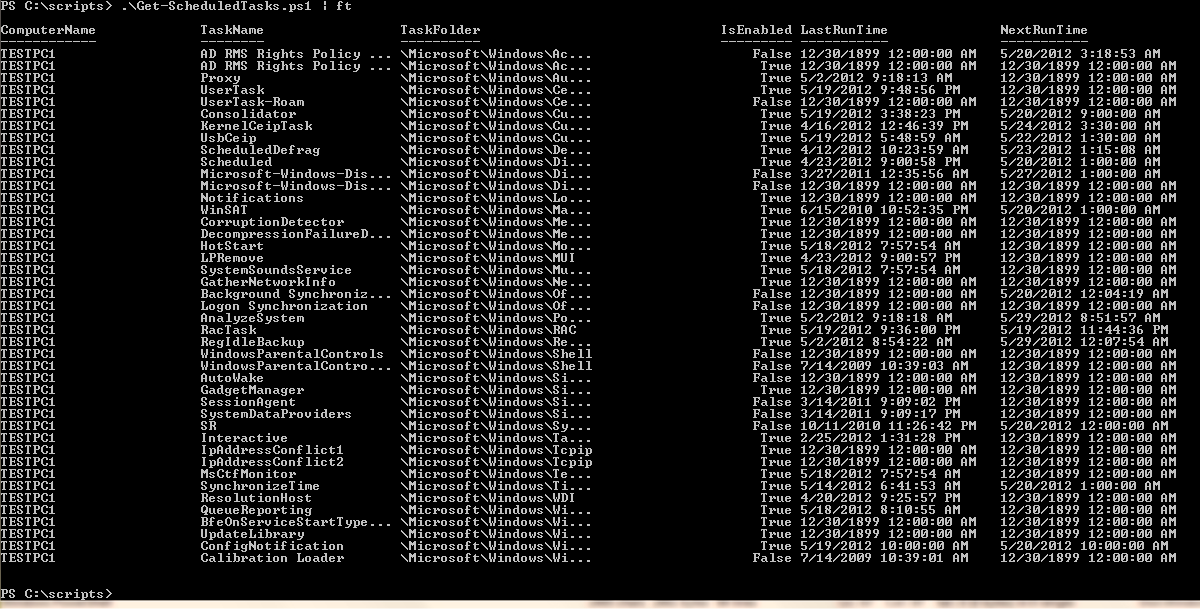
The below script helps you to query scheduled tasks from remote computer which is running with Windows 7/Windows 2008  or above. You can use this script to query multiple computers to get all the scheduled tasks. You can also query the computer by using a scheduled task name as well.

This script output contains details about when a task is last ran, what is the next execution time as well. These details helps you to quickly look at what all the tasks ran recently and what tasks will run in future at what time. This script also gives the path where this task is present. This useful to identify the location of task in task scheduler folder hierarchy that you you see in GUI.

There are managed APIs like Task Scheduler Managed Wrapper which can give you much more details about scheduled tasks running on a computer. This wrapper has many  other functions like you can create, delete and modify tasks.


[cmdletbinding()]                        
param (                        
 [parameter(ValueFromPipeline=$true,ValueFromPipelineByPropertyName=$true)]                        
 [string[]] $ComputerName = $env:computername,                        
 [string] $TaskName                        
)                        
#function to get all scheduled task folder details.                        
function Get-TaskSubFolders {                        
[cmdletbinding()]                        
param (                        
 $FolderRef                        
)                        
$ArrFolders = @()                        
$folders = $folderRef.getfolders(1)                        
if($folders) {                        
 foreach ($folder in $folders) {                        
  $ArrFolders = $ArrFolders + $folder                        
  if($folder.getfolders(1)) {                        
   Get-TaskSubFolders -FolderRef $folder                        
  }                        
 }                        
}                        
return $ArrFolders                        
}                        

#MAIN                        

foreach ($Computer in $ComputerName) {                        
 $SchService = New-Object -ComObject Schedule.Service                        
 $SchService.Connect($Computer)                        
 $Rootfolder = $SchService.GetFolder("\")            
 $folders = @($RootFolder)             
 $folders += Get-Tasksubfolders -FolderRef $RootFolder                        
 foreach($Folder in $folders) {                        
  $Tasks = $folder.gettasks(1)                        
  foreach($Task in $Tasks) {                        
   $OutputObj = New-Object -TypeName PSobject                         
   $OutputObj | Add-Member -MemberType NoteProperty -Name ComputerName -Value $Computer                        
   $OutputObj | Add-Member -MemberType NoteProperty -Name TaskName -Value $Task.Name                        
   $OutputObj | Add-Member -MemberType NoteProperty -Name TaskFolder -Value $Folder.path                        
   $OutputObj | Add-Member -MemberType NoteProperty -Name IsEnabled -Value $task.enabled                        
   $OutputObj | Add-Member -MemberType NoteProperty -Name LastRunTime -Value $task.LastRunTime                        
   $OutputObj | Add-Member -MemberType NoteProperty -Name NextRunTime -Value $task.NextRunTime                        
   if($TaskName) {                        
    if($Task.Name -eq $TaskName) {                        
     $OutputObj                        
    }                        
   } else {                        
     $OutputObj                        
   }                         
  }                        

 }                        

}

Output:

Feel Free to post here if you have any trouble in using this script. Happy to help!!!

{ 35 comments }

I recently came across a need for setting “Send As” and “Send on Behalf” permissions for a group of users on  a Distribution Group(so called mailing list). While looking out for the procedure to do it in 2010 environment, I stumbled on two articles from “http://exchangeserverpro.com” which are very informative and up to the task.

Posting them here as I felt worth sharing with my blog readers.

Thanks to Paul Cunningham for these articles.

Thanks,
Sitaram

{ 0 comments }

Powershell: Split a string by white space(s)

While writing a script today, I faced a situation where I have a string like “This is my       test                string”. As you have already noticed there are more than one spaces at different places in the string. All I need to do is eliminate all spaces and fit the words alone into a array.

Since this is a split by white space operation, I tried below and got bit surprised with the output.

$string = "This is my test string"
$string.split(" ") 

Output:

The output is array which is containing the words plus some spaces in middle. This is not what I expected. After some struggle, I made it to work by using -Split.

Now the working code is…

$string = "This is my test string"
$array = $string -split "\s+"
$array


Output:


Hope this little tip helps. Visit to http://www.powershelladmin.com/wiki/Powershell_split_operator for more examples about using -Split.

[Update]:

The usage for -split is very simple and I believe this is a best suit for simple requirements like the one I showed you above. But if you have something more complex, then you may want to explore the usage of [regedit]::Split() dotnet method.

{ 0 comments }

When people think about Internet monitoring software, the first thing that often comes to mind is ‘user control’. However, Internet monitoring software does not only prevent users from visiting unproductive or potentially harmful websites. It is also a good tool to protect users while maintaining a healthy Internet connection. Internet monitoring software boosts security, increases efficiency and makes life easier for the administrator. Here are three main reasons explaining how:

  1. Security:

Internet monitoring software can be a powerful tool in your security arsenal. Good solutions will scan filed downloaded off the internet for viruses, ensuring that infected files are stopped before causing any damage.

This class of software will help to prevent users from visiting malicious sites and exposing the network to malicious attacks. Protecting users from malicious attacks is never that easy. Even blocking access to all but a few reputable sites, might not be enough because the sites can be compromised and infected with malware. Not for the first time has a reputable site been subverted to push drive-by downloads. Internet monitoring software will mitigate these risks by protecting the user on the basis of the threat itself, rather than on where the threat is expected to reside.

  1. Information:

Information is a valuable resource to any administrator. If a network is experiencing degraded performance, manually locating the cause can be time-consuming for a busy administrator.

A good Internet monitoring software package will allow you to generate reports that give a detailed view of those machines that are consuming a lot of bandwidth and at what time. Reporting can be drilled down to individual user level as well. By comparing reports over a period of time, the administrator will be able to tell whether there is a need for additional bandwidth or excessive consumption is due to user abuse or a malware infection or botnet.

  1. Control:

Having an Internet Usage Policy is essential for effective network management, but the policy itself is only the first step. The policy will also need to be enforced.

With Internet monitoring software the administrator can set rules that block / allow sites based on pre-configured categories, as well as on how reputable those sites are. The administrator can also set usage time and download quotas for specific sites, allowing for efficient bandwidth usage management and preventing excessive bandwidth use by employees.


An admin can still provide network security, gather information and control users’ access without employing any Internet monitoring software, but to do so s/he would need various tools and then still need a lot of time to analyze the information and understand what’s going on.


This guest post was provided by Emmanuel Carabott on behalf of GFI Software Ltd. GFI is a leading software developer that provides a single source for network administrators to address their network security, content security and messaging needs. Learn more about why you need Internet monitoring software.

All product and company names herein may be trademarks of their respective owners.


{ 0 comments }

One of my friend is trying to get computers list from active directory using below code. All he want is names of the computers in a array.

$TestPcNames = Get-QAComptuer -Id TEST* | select Name            
$TestPCNames | % { write-host "$_.Name" }

There is nothing really wrong with the above code. All it contains is computer names but in object format. For that reason when he is trying to print the computer name, he is getting something like @{Name=TESTPC1}.Name

There he is stuck and now don’t know how to get list of computer accounts(in string format) in a array. This is very basic problem that every system administrator will face when trying to get their hands wet with powershell. I have also gone through this a couple of years back when I am studying ABCs of powershell.

The solution for this is very easy. First get the things printed correctly. You can use either of below one liners for that.

$TestPCNames | % { write-host "$($_.Name)" }         

$TestPCNames | % { $_.Name }

Once you seen them printed as string array(you will noted there won’t be any column header with work “Name”), all you need to do is assign the output to a variable.

$CompArray = $TestPCNames | % { write-host "$($_.Name)" }            
$CompArray = $TestPCNames | % { $_.Name }

Now $CompArray contains the list of computers. Hope this little tip helps…


{ 0 comments }

Interesting Video on PowerShell V3

Here is an interesting video about PowerShell V3 which I came across through linked in

Thought of sharing with Scripting guys…

http://channel9.msdn.com/posts/PowerShell-V3-Guru-Don-Jones?goback=%2Egde_140856_member_112620896


{ 0 comments }

“Could you please send me a screenshot of what you are seeing?”. This is a frequent question we system administrators ask the end users. So, I just got a thought why I can’t take a screenshot of desktop using powershell so that I can incorporate this to my other automations if needed. That is when this script born.

When searched in google for this, I found a stackoverflow thread(http://stackoverflow.com/questions/2969321/how-can-i-do-a-screen-capture-in-windows-powershell) where different approaches are described to take a screenshot using powershell. I could make only one method working and the other is having problems. However, the working method has a limitation as I need to explicitly pass the width and height of the screen that has to be captured. If I am interested on whole screen, from where I can get these coordinates? My previous post(Get-ScreenResolution) came handy here. I read the screen resolution details using Get-Screenresolution.ps1 script and passed the output to the function I found in stackoverflow. Now it is working exactly the way I want.

For general usage, I made few more modifications to the code to allow explicitly pass the width and height details using -Width and -Height parameters. There is also another parameter called -FileName using which you can provide the name you want for the screenshot. Don’t provide a file extension here. The script saves the output in PNG format by default. If -FileName parameter is not specified you can see the output in %temp% with Screenshot.png name.

Get-ScreenShot.ps1

[cmdletbinding()]
param(
  [string]$Width,
  [string]$Height,
  [String]$FileName = "Screenshot"

)

#Function to take screenshot. This function takes the width and height of the screen that has
#to be captured

function Take-Screenshot{
[cmdletbinding()]
param(
 [Drawing.Rectangle]$bounds, 
 [string]$path
) 
   $bmp = New-Object Drawing.Bitmap $bounds.width, $bounds.height
   $graphics = [Drawing.Graphics]::FromImage($bmp)
   $graphics.CopyFromScreen($bounds.Location, [Drawing.Point]::Empty, $bounds.size)
   $bmp.Save($path)
   $graphics.Dispose()
   $bmp.Dispose()
}

#Function to get the primary monitor resolution.
#This code is sourced from 
# https://techibee.com/powershell/powershell-script-to-get-desktop-screen-resolution/1615

function Get-ScreenResolution {
 $Screens = [system.windows.forms.screen]::AllScreens
 foreach ($Screen in $Screens) {
  $DeviceName = $Screen.DeviceName
  $Width  = $Screen.Bounds.Width
  $Height  = $Screen.Bounds.Height
  $IsPrimary = $Screen.Primary
  $OutputObj = New-Object -TypeName PSobject
  $OutputObj | Add-Member -MemberType NoteProperty -Name DeviceName -Value $DeviceName
  $OutputObj | Add-Member -MemberType NoteProperty -Name Width -Value $Width
  $OutputObj | Add-Member -MemberType NoteProperty -Name Height -Value $Height
  $OutputObj | Add-Member -MemberType NoteProperty -Name IsPrimaryMonitor -Value $IsPrimary
  $OutputObj
 }
}

#Main script begins

#By default captured screenshot will be saved in %temp% folder
#You can override it here if you want
$datetime = (Get-Date).tostring("dd-MM-yyyy-hh-mm-ss")
$FileName = "{0}-{1}" -f $FileName, $datetime
$Filepath = join-path $env:temp $FileName

[void] [Reflection.Assembly]::LoadWithPartialName("System.Windows.Forms")
[void] [Reflection.Assembly]::LoadWithPartialName("System.Drawing")

if(!($width -and $height)) {

 $screen = Get-ScreenResolution | ? {$_.IsPrimaryMonitor -eq $true}
 $Width = $screen.Width
 $Height = $screen.height
}

$bounds = [Drawing.Rectangle]::FromLTRB(0, 0, $Screen.Width, $Screen.Height)

Take-Screenshot -Bounds $bounds -Path "$Filepath.png"
#Now you have the screenshot

Usage:

Simple, just run the script from powershell window, you will see the output in %temp%\screenshot-29-02-2020-07-34-04.png

Hope this helps… feedback welcome.

{ 17 comments }

If you are using Write-EventLog to write any new events to event log, it is possible that you might see below error.

Write-EventLog : The source name “XXX” does not exist on computer “localhost”.

I am into similar situation today. What I was doing is trying to write a new event in to Application event log with a Event Source that is not already exists in the computer where I am trying. So the error message makes sense. It is saying the source I am trying to use, XXX doesn’t exists. So, how should get this added to list of available event sources in the computer so that it won’t through the error message again.

After little bit of googling, I found the below method promising.

New-EventLog -LogName Application -Source “XXX”

This command creates a new event source in Application Event log with the name XXX. All I need to do is just use this command once and try the write-EventLog cmdlet with the same source name(XXX). It worked this time.

Hope this little trick helps you…

[Update]

There are some dotnet ways available as well to see if a given source is available in EventLog and create one if needed.

To check if the source exists:

PS C:\> [system.diagnostics.eventlog]::SourceExists(“XXX”)
False
PS C:\>

To create a new source entry in event log:

[system.diagnostics.EventLog]::CreateEventSource(“XXX”, “Application”)


{ 3 comments }