≡ Menu

“Could you please send me a screenshot of what you are seeing?”. This is a frequent question we system administrators ask the end users. So, I just got a thought why I can’t take a screenshot of desktop using powershell so that I can incorporate this to my other automations if needed. That is when this script born.

When searched in google for this, I found a stackoverflow thread(http://stackoverflow.com/questions/2969321/how-can-i-do-a-screen-capture-in-windows-powershell) where different approaches are described to take a screenshot using powershell. I could make only one method working and the other is having problems. However, the working method has a limitation as I need to explicitly pass the width and height of the screen that has to be captured. If I am interested on whole screen, from where I can get these coordinates? My previous post(Get-ScreenResolution) came handy here. I read the screen resolution details using Get-Screenresolution.ps1 script and passed the output to the function I found in stackoverflow. Now it is working exactly the way I want.

For general usage, I made few more modifications to the code to allow explicitly pass the width and height details using -Width and -Height parameters. There is also another parameter called -FileName using which you can provide the name you want for the screenshot. Don’t provide a file extension here. The script saves the output in PNG format by default. If -FileName parameter is not specified you can see the output in %temp% with Screenshot.png name.

Get-ScreenShot.ps1

[cmdletbinding()]
param(
  [string]$Width,
  [string]$Height,
  [String]$FileName = "Screenshot"

)

#Function to take screenshot. This function takes the width and height of the screen that has
#to be captured

function Take-Screenshot{
[cmdletbinding()]
param(
 [Drawing.Rectangle]$bounds, 
 [string]$path
) 
   $bmp = New-Object Drawing.Bitmap $bounds.width, $bounds.height
   $graphics = [Drawing.Graphics]::FromImage($bmp)
   $graphics.CopyFromScreen($bounds.Location, [Drawing.Point]::Empty, $bounds.size)
   $bmp.Save($path)
   $graphics.Dispose()
   $bmp.Dispose()
}

#Function to get the primary monitor resolution.
#This code is sourced from 
# https://techibee.com/powershell/powershell-script-to-get-desktop-screen-resolution/1615

function Get-ScreenResolution {
 $Screens = [system.windows.forms.screen]::AllScreens
 foreach ($Screen in $Screens) {
  $DeviceName = $Screen.DeviceName
  $Width  = $Screen.Bounds.Width
  $Height  = $Screen.Bounds.Height
  $IsPrimary = $Screen.Primary
  $OutputObj = New-Object -TypeName PSobject
  $OutputObj | Add-Member -MemberType NoteProperty -Name DeviceName -Value $DeviceName
  $OutputObj | Add-Member -MemberType NoteProperty -Name Width -Value $Width
  $OutputObj | Add-Member -MemberType NoteProperty -Name Height -Value $Height
  $OutputObj | Add-Member -MemberType NoteProperty -Name IsPrimaryMonitor -Value $IsPrimary
  $OutputObj
 }
}

#Main script begins

#By default captured screenshot will be saved in %temp% folder
#You can override it here if you want
$datetime = (Get-Date).tostring("dd-MM-yyyy-hh-mm-ss")
$FileName = "{0}-{1}" -f $FileName, $datetime
$Filepath = join-path $env:temp $FileName

[void] [Reflection.Assembly]::LoadWithPartialName("System.Windows.Forms")
[void] [Reflection.Assembly]::LoadWithPartialName("System.Drawing")

if(!($width -and $height)) {

 $screen = Get-ScreenResolution | ? {$_.IsPrimaryMonitor -eq $true}
 $Width = $screen.Width
 $Height = $screen.height
}

$bounds = [Drawing.Rectangle]::FromLTRB(0, 0, $Screen.Width, $Screen.Height)

Take-Screenshot -Bounds $bounds -Path "$Filepath.png"
#Now you have the screenshot

Usage:

Simple, just run the script from powershell window, you will see the output in %temp%\screenshot-29-02-2020-07-34-04.png

Hope this helps… feedback welcome.

{ 17 comments }

If you are using Write-EventLog to write any new events to event log, it is possible that you might see below error.

Write-EventLog : The source name “XXX” does not exist on computer “localhost”.

I am into similar situation today. What I was doing is trying to write a new event in to Application event log with a Event Source that is not already exists in the computer where I am trying. So the error message makes sense. It is saying the source I am trying to use, XXX doesn’t exists. So, how should get this added to list of available event sources in the computer so that it won’t through the error message again.

After little bit of googling, I found the below method promising.

New-EventLog -LogName Application -Source “XXX”

This command creates a new event source in Application Event log with the name XXX. All I need to do is just use this command once and try the write-EventLog cmdlet with the same source name(XXX). It worked this time.

Hope this little trick helps you…

[Update]

There are some dotnet ways available as well to see if a given source is available in EventLog and create one if needed.

To check if the source exists:

PS C:\> [system.diagnostics.eventlog]::SourceExists(“XXX”)
False
PS C:\>

To create a new source entry in event log:

[system.diagnostics.EventLog]::CreateEventSource(“XXX”, “Application”)


{ 3 comments }

The Powershell code described in this article will help you to get screen resolution details of your desktops It uses System.Drawing and System.Windows.Forms namespaces. The Screen class in System.Windows.Forms provides the data we need — that is screen resolution details. This code will also tell you which one is your primary monitor and it’s resolution details.

Code:

function Get-ScreenResolution {            
[void] [Reflection.Assembly]::LoadWithPartialName("System.Windows.Forms")            
[void] [Reflection.Assembly]::LoadWithPartialName("System.Drawing")            
$Screens = [system.windows.forms.screen]::AllScreens            

foreach ($Screen in $Screens) {            
 $DeviceName = $Screen.DeviceName            
 $Width  = $Screen.Bounds.Width            
 $Height  = $Screen.Bounds.Height            
 $IsPrimary = $Screen.Primary            

 $OutputObj = New-Object -TypeName PSobject             
 $OutputObj | Add-Member -MemberType NoteProperty -Name DeviceName -Value $DeviceName            
 $OutputObj | Add-Member -MemberType NoteProperty -Name Width -Value $Width            
 $OutputObj | Add-Member -MemberType NoteProperty -Name Height -Value $Height            
 $OutputObj | Add-Member -MemberType NoteProperty -Name IsPrimaryMonitor -Value $IsPrimary            
 $OutputObj            

}            
}


Output:

Hope this helps…


{ 6 comments }

In one of my previous posts I talked about how to disable/enable LAN connections on a Windows 2008 Core server using command line. In this post, I am going to present you a much enhanced version of it using powershell. This powershell script helps you to disable or enable any network connection in either local computer or remote computer easily. You can use this script to perform this operation on multiple computers — will give usage example at the end of this post.

In this script I am using Win32_NetworkAdapter WMI class which has methods for enabling or disabling a given network connection. By default, the script looks for network connections with the name Local Area Connection to perform disable or enable operations. If you want to perform these actions against different network connections(like HP Team#1) you can specify that using -ConnectionName parameter. The -Disable or -Enable parameters are for specifying the kind of operation you want to perform. The script will fail if you don’t find either of them. Similarly, you can use -ComputerName parameter if you want to perform this operation against remote computer. You can also provide the list of computers to this argument. I want you be more conscious while using this script against remote computer. The reason behind it is, if you are attempting to disable the primary network connection in remote computer, the script may not return the success/failure status. The reason is simple, it lost the connection to remote computer because you just disabled it. You may find this script handy when you want to disable non-primary connections on remote computers. Since the primary connection is ON in this case, this can return you the status. I didn’t perform any testing against remote computers explicitly so please do testing in your test lab before trying in production.


Code : Set-NetworkConnection

function Set-NetworkConnection {
[cmdletbinding()]
param (
 [parameter(ValueFromPipeline=$true,ValueFromPipelineByPropertyName=$true)]
    [string[]]$ComputerName = $env:computername,            

 [switch]$Enable,
 [switch]$Disable,
 [String]$ConnectionName = "Local Area Connection"
)            

begin {            

if(-not($enable -or $disable)) {
 write-Error " You should select either of -Enable or -Disable switches. Exiting"
 exit
}            

}
process {
 foreach ($Computer in $ComputerName) {
  $Computer = $Computer.ToUpper()
  if(Test-Connection -ComputerName $Computer -Count 1 -ea 0) {
   $Networks = Get-WmiObject Win32_NetworkAdapter -ComputerName $Computer | ? {$_.NetConnectionID -match $ConnectionName}
   foreach ($Network in $Networks) {
    if($Enable) {
     $retval  = $Network.Enable()
     if($retval.ReturnValue -eq 0) {
      Write-host "Successfully enabled `"$($network.NetConnectionID)`" on $Computer"
     } else {
      write-host "Failed to enable `"$($network.NetConnectionID)`" on $Computer"
     }
    } elseif($Disable) {
     $retval  = $Network.Disable()
     if($retval.returnValue -eq 0) {
      Write-host "Successfully disabled `"$($network.NetConnectionID)`" on $Computer"
     } else {
      write-host "Failed to disable `"$($network.NetConnectionID)`" on $Computer"
     }            

    }
   }
  }
 }
}            

end {}
}


Usage Examples:

.\Set-NetworkConnection -Enable #to enable local network connection

.\Set-NetworkConnection -Disable #to disable local network connection

.\Set-NetworkConnection -Disable -ConnectionName “My network2” #to disable the local network connection that has the name “My Network2”

.\Set-NetworkConnection -ComputerName MyPC2 -Disable -ConnectionName “My network2” #to disable the network connection that has the name “My Network2” on MyPC2

Get-Content C:\mypcs.txt | Set-NetworkConnection -Disable -ConnectionName “My Network2” #To disable the network connection name “My network2” on list of PCs in C:\mypcs.txt file

Hope this helps… Happy learning…

{ 4 comments }

SQL: Native backup compression failures

You may notice the below error while configuring your SQL server to support backup compression by executing sp_configure ‘backup compression default’ ‘1’ SQL command.

The configuration option ‘backup compression default’ does not exist, or it may be an advanced option.

The reason for this failure is, simple. You SQL server version is not supporting compression. Per Technet (http://technet.microsoft.com/en-us/library/bb964719.aspx), only SQL 2008 enterprise and later versions supports backup compression. That means, if you have any flavors of SQL server 2008 except enterprise version, you can not use backup compression feature. However, you can still use any version of SQL server 2008 to restore compressed backups. When it comes to SQL server 2008 R2(not that I earlier talked about only SQL 2008 — not R2), we can use any version to backup in compressed format and similarly the restorations.

To find the version of your SQL server, you can either check it from GUI or just use the below powershell code.

            
$SQLServer = "Myserver1"            
[System.Reflection.Assembly]::LoadWithPartialName('Microsoft.SqlServer.SMO') | Out-Null            
$server = New-Object ('Microsoft.SqlServer.Management.Smo.Server') $SQLServer            
$server | Select Name, Version

This code returns the version number(like 10.0.2531). You can refer http://sqlserverbuilds.blogspot.in/ to know product name of this version.

Please feel free to post if you have any questions.


{ 0 comments }

Would it not be helpful if all scripts are at one place and you can navigate/browse them through single window?
Microsoft team is working on a tool called Script Explorer for Windows Powershell.

Go through below link for more details.

http://blogs.technet.com/b/exchange/archive/2012/03/14/check-out-microsoft-script-explorer-for-windows-powershell-pre-release.aspx

{ 1 comment }

Microsoft Partner network is offering online training to help people preparing for Microsoft Certification Exams 70-659(Server Virtualization) and 70-669 (Desktop Virtualization). This may be not just for certification per say, but will also improve your competencies in virtualization.

Clear procedure for accessing these training sessions online is available at

http://www.digitalwpc.com/GetInvolved/MSPartnerPerspectives/TrainingSpotlight/Pages/Free-Training-Is-Back-for-Exams-70-659-and-70-669!.aspx

I thought I will spread this word though I didn’t try this training personally. Happy Learning.


{ 0 comments }

The purpose of this article is to explain how event forwarding works, different types of event forwarding methods and step-by-step guide for implementing them.

In this part-1 of How to configure event forwarding in windows 7/2008, I will cover some basics about event forwarding, different components involved in the forwarding and their functionality.

Windows 7 and windows 2008 R2 OS supports forwarding event log message to a central defined server. The purpose of this is very simple, you have all required events in one place and you can do auditing, archival, or any other operation you want from single place. You need not depend on external scripts to collect windows event logs from different computers and place them at single place.

There are two main components involved in Event Forwarding.

1) Collector:

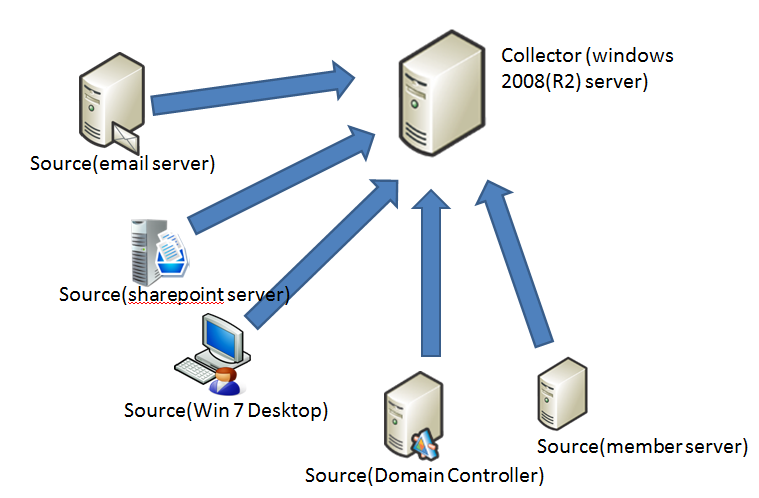
Collector is a windows computer which collects events logs from computers from your network and places locally. In other words, this is where all events are saved.

2) Forwarder/Source Computer:

This is a windows computer that forwards the events from local computer to a central computer which is designated as Collector.

The definition of source computer and collector are pretty clear and I believe there is no need to explain them in details. If you are still in doubt, the below picture should definitely clarify that.

Now we know what is source computer and what is a collector computer in event forwarding. The next question you might get is, whether source computer will initiate the event forwarding or the collector will do that. Based on which component is initiating the event forwarding request, the windows event log forwarding is divided into two types. They are called subscriptions.

1) Collector initiated subscription:

In this type of subscription, the collector will go and ask the remote computer to send events to it. It is the job of collector to frequently poll the source computers and get events logs from them. This kind of subscription is best suited when you have limited set of computers. This doesn’t scale well if the source computer base increases.

2) Source initiated subscription:

In this type of subscription, the source computer will send the events logs to collector computer. The job of the collector computer is to just save whatever the source computer sends.

For either collector initiated forwarding or source initiated forwarding a subscription needs to be created at the collector side. A subscription is nothing but a configuration which tells you what eventlogs/events ID should be forwarded. Also the destination of log of the forwarded events will be configured in subscription.

To make event forwarding work, the collector and source computer should be configured do that. I will cover this in detail when I talk about each type of subscription in my next posts.

Another information that is worth sharing is, what type of operating systems can act as source computer and what type of operating systems can play collector role.

Source Computer:

  1. Windows XP with Service Pack 2 (SP2)
  2. Windows Server 2003 with Service Pack 1 (SP1)
  3. Windows Server 2003 with Service Pack 2 (SP2)
  4. Windows Server 2003 R2, Windows Vista
  5. Windows Vista with SP1
  6. Windows 7
  7. Windows Server 2008
  8. Windows 2008 R2

Collector Computer:

  1. Windows Vista with SP1
  2. Windows 7
  3. Windows Server 2008
  4. Windows 2008 R2

One point to note here is, WS-Management 1.1 is not installed by default for computers running on Windows XP with SP2, Windows Server 2003 with SP1, Windows Server 2003 with SP2, or Windows Server 2003 R2, so you must install WS-Man 1.1 to use these platforms as event sources before you set up a source-initiated event subscription. For more information about how to install, WS-Management 1.1, see http://go.microsoft.com/fwlink/?LinkId=100895.

In my next posts I will talk about how to configure source initiated subscription and collector initiated subscription in details.

{ 0 comments }

Disk Cleanup Utility missing in Windows Server 2008

By this time we as administrators could have noticed that disk cleanup utility is missing in Windows Server 2008. Disk Cleanup/Clean Manager (cleanmgr.exe) is not appeared by default in Volume Properties. Need to follow few steps as below to clean up the volume.

Summary

The Disk Cleanup executable file cleanmgr.exe and the associated Disk Cleanup button are not present in Windows Server® 2008 or in Windows Server® 2008 R2 by default.
Cause

This is by design, as the Disk Cleanup button is part of the Desktop Experience feature. In order to have Disk Cleanup button appear on a disk’s Properties dialog, you will need to install the Desktop Experience feature.

Resolution

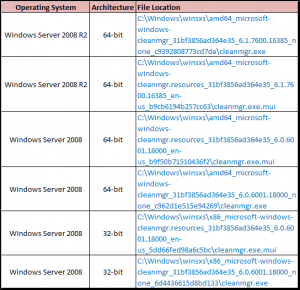
So in order to use cleanmgr.exe you’ll need to copy two files that are already present on the server, cleanmgr.exe and cleanmgr.exe.mui. Use the following table to locate the files for your operating system.

Once you’ve located the files move them to the following locations:

  1. Cleanmgr.exe should go in %systemroot%\System32.
  2. Cleanmgr.exe.mui should go in %systemroot%\System32\en-US.
  • You can now launch the Disk cleanup tool by running Cleanmgr.exe from the command prompt.
  • Disk Cleanup can now be run by entering Cleanmgr.exe into a command prompt, or by clicking Start and typing Cleanmgr into the   Search bar.

Reference: http://technet.microsoft.com/en-us/library/ff630161(WS.10).aspx

{ 2 comments }

I came across a situation today where I had to find out the switch details to which a particular server is connected. Often we come across such kind of cases where your network administrator is unavailable to tell you which switch/port it is or data center engineer not around to help you with this information.

After thinking about this problem for sometime, one thing clicked in my mind. I remember in VMWare ESX environment, I used CDP(Cisco Discovery protocol) abilities from Virtual center to find out to which switch a NIC is connected. That means all I need to do is, get this CDP information from the switch to which my server NIC/network connection is connected to. So, the question remained is, how do we send the CDP request to the switch, and how to analyze that data.

I did some googling and realized that I am not alone in this world and there are several people who are having similar requirements for different purposes. Then I started looking for CDP utilities for windows operating system and located one — CDP Monitor from TellSoft. I have seen a few people recommended using this in some forums. I didn’t try it personally but you may want to look at this tool. You can get it from http://www.tallsoft.com/cdpmonitor.htm

I didn’t try this tool directly but while going through the information about this tool, I saw somewhere it is mentioned that this uses WinPCAP and fetches the CDP information from that. Then I thought, if it is using WinPCAP why not use Wireshark to get this information? This tool is already available on my server(because it is a much have tool for any deep dives). I captured the network traffic on the server for sometime using Wireshark and looked for the filters that can show only the CDP information and I am successful. I have got the switch details I needed.

Below is the brief procedure:

  1. Download and install Wireshark from http://www.wireshark.org/download.html
  2. Launch Wireshark and start capturing the traffic on interface for which you need to find the swtich and port details.
  3. Let the capture run for few minutes and then in Filter section type CDP and click on Apply.
  4. This will show the CDP traffic flow through the server
  5. Now select the CDP traffic and expand Cisco Discovery Protocol section in packet details pane.
  6. Here the the Device ID represents the switch name to which your server connected
  7. And the Port ID represents the ethernet port on switch to which your server is connected

Hmm… I found what I need. I thought documenting this will help other as well and hence authored this port. Feel free to comment.


{ 8 comments }