≡ Menu

One thing that I don’t like while working with ActiveDirectory PowerShell module is, it’s slowness in loading and the crazy progress bar that it shows while creating default AD: drive.

AD-PSDrive-Progressbar

Honestly, I don’t use the AD: ps drive to manage active directory objects as the cmdlets are sufficient enough for most of the operations. Moreover, seeing this progress bar while running the scripts that loads ActiveDirectory module is not nice thing. Also creating the AD: drive is taking quite a bit of time.

I wanted to get rid of all these and just want to import the AD cmdlets alone. While searching for that, I come across a post from Active Directory PowerShell team which helped me. To suppress the progress bar, just below one line before calling the Import-Module.

$Env:ADPS_LoadDefaultDrive = 0

So, that makes your code look like below. With this the import operation will complete fast and you don’t see the progress bar as well.

$Env:ADPS_LoadDefaultDrive = 0            
Import-Module -Name ActiveDirectory            
Get-ADUser -Identity "testuser1"

Hope this helps and happy learning.

{ 1 comment }

We configure logon scripts to prepare the environment of user. But the behavior that brought in with Windows 8.1 & Windows server 2012 R2 group policies might drive you nuts and you may observe a delay of 5 minutes before your logon scripts starts executing.

If you are running in to the same issue where your login scripts are delayed and because of that user experience(like drive mapping, printer configuration, etc) is affected, then you might want to consider tuning the below Group Policy setting to bring back the things to normal.

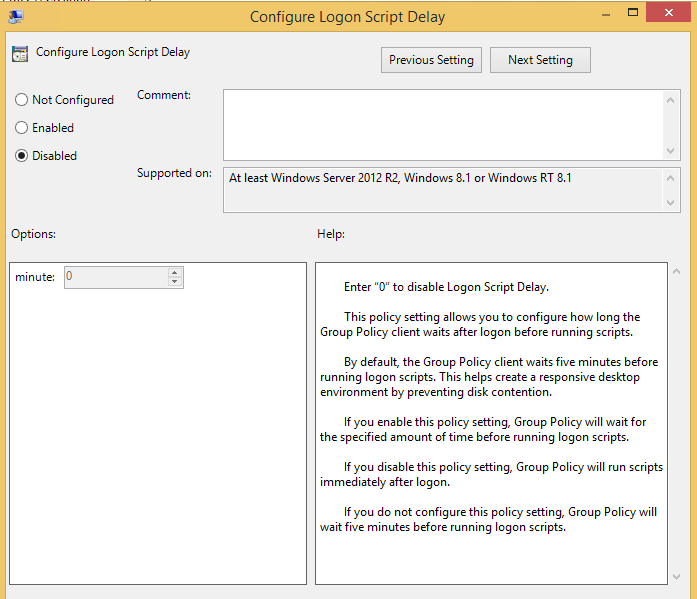
Configure Logon Script Delay is the policy that Microsoft introduced with Windows 8.1 & Windows Server 2012 R2 which will add default 5 minutes delay to start-up of your logon scripts execution when not configured or enabled. If you don’t want to have this delay for your logon scripts and want to complete their execution before the desktop is presented to user, then you should consider disabling this.

You can find this policy under Computer Configuration\Policies\Administrative Templates\System\Group Policy

GPO-Logonscript-delay

Here is the help content you will find group policy setting:

Enter “0” to disable Logon Script Delay.

This policy setting allows you to configure how long the Group Policy client waits after logon before running scripts.

By default, the Group Policy client waits five minutes before running logon scripts. This helps create a responsive desktop environment by preventing disk contention.

If you enable this policy setting, Group Policy will wait for the specified amount of time before running logon scripts.

If you disable this policy setting, Group Policy will run scripts immediately after logon.

If you do not configure this policy setting, Group Policy will wait five minutes before running logon scripts.

Hope this helps…

{ 1 comment }
PSHUG-Meet#1

Being a Hyderabadi, I am very excited to see Hyderabad PowerShell User group (PSHUG) taking a shape. Last Saturday (28-June-2014), we have our first Hyderabad PowerShell User Group inaugural meet. The best thing about the meet is having Bruce Payette on floor. He is one of the Principal developers in PowerShell team at Microsoft and author of most famous book “PowerShell In Action”. Everyone felt honoured to have him in the room and listening to him talking about PowerShell stuff.

It is a great start. I personally felt very happy attending this meet and interacting with the people, especially with Bruce. He is quite fast with word rate, so you need to pay full attention while listening to him. The session from Bruce about history and future of PowerShell is very informative. I also had a chance to talk about my experience with PowerShell, how I started learning and improving my skill.

Having regular sessions like this will motivate the individuals and increase the usage of PowerShell. Though the attendance is a bit on lower side for this event, I am sure the next events will be crowded and much more interactive.

Harshul Patel is the man behind this. Though he joined Microsoft a few weeks back, he make everything happen right from inviting Bruce, arranging the venue and organizing the whole event. Thanks Harshul for interest and commitment towards the event. Wish to see to much more coming in future. Btw, I liked your Book, Instant Windows PowerShell Guide.

Special thanks to Bruce Payette for his presence and session.

{ 7 comments }

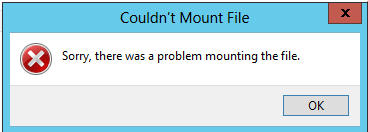
Couldn’t mount file. Sorry, there was a problem mounting the file

ISO mount error

You might get this error message while trying to mount an ISO file on Windows 8 or Windows Server 2012. This article helps you in understanding the root cause and find a solution for this problem.

I ran into this problem first time when I was working on automating building VHD files from ISO file directly (see the related article here). Recently noticed this again while upgrading my lab to Windows Server 2012. Since this is hindering my work often, I decided to understand this issue more and found some interesting details.

The issue behind failing to mount ISO files is, it has got a sparse flag set. You can read more about this particular file attribute at this MSDN page(http://msdn.microsoft.com/en-us/library/windows/desktop/aa365564%28v=vs.85%29.aspx). In a nutshell, this sparse flag is facility supported in NTFS file system that enables efficient use of disk space by not writing zeros in a data stream. Instead it maintains an internal list containing the location zeros in file.

So the solution is to remove that sparse flag to mount the ISO. At this moment, I am not clear why the mounting will not work if this flag is set. May be because CDFS file system cannot understand this flag and hence the errors.

There are two ways you can remove the sparse flag:

  1. Just by simple copy & paste: You can copy & paste the ISO file into same folder or different folder. The sparse flag will be removed when a copy of this file is made. You can use the copied file to mount as CD/DVD drive
  2. Remove the sparse flag programmatically: You can use below approach to remove the sparse flag on one of multiple files.

To know if a file has sparse flag, try the below command. The output will show list of flags that the file has.

[System.IO.File]::GetAttributes("d:\Softwares\R2.ISO")
sparse file query

Alternatively you can use fsutil as well to check if the file has sparse flag.

fsutil sparse queryflag R2.ISO

To remove the sparse flag, use the below code:

function Remove-SparseFlag {            
[cmdletbinding()]            
param(            
[string]$FileName            
)            
    if(!(Test-Path $FileName)) {             
        Write-Host "$FileName No such filename present"            
        return            
    }            
            
    $Attribs = [System.IO.File]::GetAttributes($FileName)            
    if($Attribs.HasFlag([System.IO.FileAttributes]::SparseFile)) {            
        Invoke-Expression -Command "fsutil sparse setflag '$FileName' 0"            
        if($LASTEXITCODE -ne 0) {            
            Write-host "Failed to remove sparse flag on $FileName"            
        } else {            
            Write-Host "Successfully removed the sparse flag on $FileName"            
        }            
    } else {            
        Write-Host "$FileName has no sparse flag set"            
    }            
            
            
}

Output:

remove sparse flag

I tried to remove the sparse flag dotnet way, but it is not working for some reason. I will explore that more when I get a chance.

{ 4 comments }

Working with services is quite common action for any windows administrators. In this post, we will see how to set a list of services to disabled state in remote computers using PowerShell.

Often system administrators get requirement to disable services on list of remote computers. This script will help such admins who are having similar requirement. This script is a simple wrapper based on Get-WMIObject query and Set-Service cmdlets. The advantage with Get-WMIObject is that it can give you the startup mode of a give services. Neither Get-Service nor any other approach(except sc.exe) gives you this information. So I always feel comfortable calling Win32_Service WMI class with Get-WMIObject cmdlets as it returns major set of information. However service objects obtained via Get-WMIObject lagging facility to set a service to disabled. That is when Set-Service cmdlets comes handy. This is one of the less exposed cmdlets – I don’t see many people using this. Rather everyone relying on calling sc.exe from PowerShell.

This script takes two arguments.

  1. ComputerName : you can pass single or multiple computernames to this parameter as a comma separated. If this parameter is not specified, script works against local computer.
  2. ServiceName : This is a mandatory parameter where you need to give list of services that you want to stop and disable.

Code

[cmdletbinding()]
param(
    [string[]]$ComputerName = $env:ComputerName,
    
    [parameter(Mandatory=$true)]
    [string[]]$ServiceName
)

foreach($Computer in $ComputerName)
{
    Write-Host "Working on $Computer"
    if(!(Test-Connection -ComputerName $Computer -Count 1 -quiet)) {
        Write-Warning "$computer : Offline"
        Continue
    }

    foreach($service in $ServiceName)
    {
        try
        {
            $ServiceObject = Get-WMIObject -Class Win32_Service -ComputerName $Computer -Filter "Name='$service'" -EA Stop
            if(!$ServiceObject) 
            {
                Write-Warning "$Computer : No service found with the name $service"
                Continue
            }
            if($ServiceObject.StartMode -eq "Disabled")
            {
                Write-Warning "$Computer : Service with the name $service already in disabled state"
                Continue
            }

            Set-Service -ComputerName $Computer -Name $service -EA Stop -StartMode Disabled
            Write-Host "$Computer : Successfully disabled the service $service. Trying to stop it"
            if($ServiceObject.state -eq "Stopped") 
            {
                Write-Warning "$Computer : $service already in stopped state"
                Continue
            }
            $retval = $ServiceObject.StopService()

            if($retval.ReturnValue -ne 0) 
            {
                Write-Warning "$Computer : Failed to stop service. Return value is $($retval.ReturnValue)"
                Continue
            }

            Write-Host "$Computer : Stopped service successfully"

        } catch 
        {
            Write-Warning "$computer : Failed to query $service. Details : $_"
            Continue
        }

    }

}

Output

The output of the script is a simple text with the status of disabling & stopping each service.

Hope this helps…

{ 22 comments }

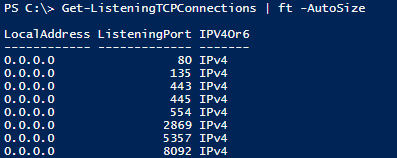
In this short post, let us see how to query list of listening ports in local computer using PowerShell without using netstat.exe.

We know that below simple command will help in querying the list of listening ports, but capturing the output and filtering the output for specific IPs/ports is not straightforward with this approach.

So let us see how to achieve this without using netstat.exe and by relying on dotnet methodologies. The System.Net.NetworkInformation.IPGlobalProperties class contains the information about these listening ports as well. In my previous post, I talked about how to get list of active ports using same dotnet class.

READ : Query list of active TCP connections in Windows using PowerShell

The GetActiveTcpListeners() method will return list of listening connections, local IP addresses, and the port they are listening on. The below code will return this information in object format so that information can be easily filtered to fetch the desired output.

CODE

Function Get-ListeningTCPConnections {            
[cmdletbinding()]            
param(            
)            
            
try {            
    $TCPProperties = [System.Net.NetworkInformation.IPGlobalProperties]::GetIPGlobalProperties()            
    $Connections = $TCPProperties.GetActiveTcpListeners()            
    foreach($Connection in $Connections) {            
        if($Connection.address.AddressFamily -eq "InterNetwork" ) { $IPType = "IPv4" } else { $IPType = "IPv6" }            
                    
        $OutputObj = New-Object -TypeName PSobject            
        $OutputObj | Add-Member -MemberType NoteProperty -Name "LocalAddress" -Value $connection.Address            
        $OutputObj | Add-Member -MemberType NoteProperty -Name "ListeningPort" -Value $Connection.Port            
        $OutputObj | Add-Member -MemberType NoteProperty -Name "IPV4Or6" -Value $IPType            
        $OutputObj            
    }            
            
} catch {            
    Write-Error "Failed to get listening connections. $_"            
}           
}

OUTPUT

tcplistening

Hope this helps…

{ 5 comments }

Its small tip that you want to try if you don’t want to use netstat.exe command to get the active TCP connection details on a Windows server.

The System.Net.NetworkInformation.IPGlobalProperties dotnet class will help you get this information in a simple way. We can find connection local address, local port, remote address, remote port, IP address type and state of the connection. The advantage is output is returned in Object format so that you can apply further filters to extract the data you need.

CODE:

Function Get-ActiveTCPConnections {            
[cmdletbinding()]            
param(            
)            
            
try {            
    $TCPProperties = [System.Net.NetworkInformation.IPGlobalProperties]::GetIPGlobalProperties()            
    $Connections = $TCPProperties.GetActiveTcpConnections()            
    foreach($Connection in $Connections) {            
        if($Connection.LocalEndPoint.AddressFamily -eq "InterNetwork" ) { $IPType = "IPv4" } else { $IPType = "IPv6" }            
        $OutputObj = New-Object -TypeName PSobject            
        $OutputObj | Add-Member -MemberType NoteProperty -Name "LocalAddress" -Value $Connection.LocalEndPoint.Address            
        $OutputObj | Add-Member -MemberType NoteProperty -Name "LocalPort" -Value $Connection.LocalEndPoint.Port            
        $OutputObj | Add-Member -MemberType NoteProperty -Name "RemoteAddress" -Value $Connection.RemoteEndPoint.Address            
        $OutputObj | Add-Member -MemberType NoteProperty -Name "RemotePort" -Value $Connection.RemoteEndPoint.Port            
        $OutputObj | Add-Member -MemberType NoteProperty -Name "State" -Value $Connection.State            
        $OutputObj | Add-Member -MemberType NoteProperty -Name "IPV4Or6" -Value $IPType            
        $OutputObj            
    }            
            
} catch {            
    Write-Error "Failed to get active connections. $_"            
}           
}

OUTPUT:

TCP-Connections

Hope this helps and happy learning.

{ 4 comments }

Using Parametersets in PowerShell

Parameter sets in PowerShell allows grouping of parameters so that availability of parameters is controlled based on what is already specified and at what position. Great way to write proper production scripts. They are available from PowerShell V2 onward.

I found couple of useful posts on this topic which are giving good explanation of this approach with some easy examples. It is important to understand them property before try in your scripts. Otherwise you will end up removing them from code due to frustration. That means you are loosing great power in validating the arguments.

Below are the two articles I found useful to understand parameter sets.

http://blog.powershell.no/2012/07/02/how-to-configure-a-function-parameter-to-belong-to-multiple-parameter-sets/

http://blogs.msdn.com/b/powershell/archive/2008/12/23/powershell-v2-parametersets.aspx

Happy learning…

{ 0 comments }

The script discussed in this article will help you to query environment variable values on remote windows computer using PowerShell.

Environment variables on a computer can be accessed via  Env:\ PSdrive or [System.Environment] dotnet class locally. None of these methods can be used to query environment variables remotely. Only exception is, you can use one of these methods through PowerShell remoting to get environment variable information. However that is not true remote query and doesn’t work in cases where remoting not available plus systems where PS is not installed.

In such cases, WMI will come handy to query this information remotely. Win32_Environment WMI class has information about environmental variables and querying the instances of this class will give us the desired output. My script is a wrapper around this WMI class to return the environment variable values.

This script takes two arguments. 1) ComputerName and 2) Name. While the computer name represents name of the computer from which you want to query environment variables and Name parameter is the name of environment variable you want to query. Both of these are optional parameters.

Code:

[cmdletbinding()]            
param(            
 [string[]]$ComputerName =$env:ComputerName,            
 [string]$Name            
)            
            
foreach($Computer in $ComputerName) {            
 Write-Verbose "Working on $Computer"            
 if(!(Test-Connection -ComputerName $Computer -Count 1 -quiet)) {            
  Write-Verbose "$Computer is not online"            
  Continue            
 }            
             
 try {            
  $EnvObj = @(Get-WMIObject -Class Win32_Environment -ComputerName $Computer -EA Stop)            
  if(!$EnvObj) {            
   Write-Verbose "$Computer returned empty list of environment variables"            
   Continue            
  }            
  Write-Verbose "Successfully queried $Computer"            
              
  if($Name) {            
   Write-Verbose "Looking for environment variable with the name $name"            
   $Env = $EnvObj | Where-Object {$_.Name -eq $Name}            
   if(!$Env) {            
    Write-Verbose "$Computer has no environment variable with name $Name"            
    Continue            
   }            
   $Env               
  } else {            
   Write-Verbose "No environment variable specified. Listing all"            
   $EnvObj            
  }            
              
 } catch {            
  Write-Verbose "Error occurred while querying $Computer. $_"            
  Continue            
 }            
            
}

Usage:

.\Get-Environmentvariable.ps1 -ComputerName TESTPC1

This returns the list of environment variables on TESTPC1 computer.

.\Get-EnvironmentVariable.ps1 -ComputerName TESTPC1 -Name PATH

This returns the environment variable that matches the name PATH

I have also made this script available in TechNet Script Gallery.

{ 5 comments }

I have written a post on the same topic sometime back but that was relying on environment variables to find the CPU architecture. While that is reliable, it can not be extended easily to query remote computers CPU architecture. The script I am going to discuss in this article relies on WMI classes to get the CPU architecture.

Per MSDN, the Architecture property of Win32_Processor class represent the type of architecture of  CPU. So the below script queries the Architecture value to get the CPU architecture. It will not only cover x86/x64-bit processor architecture but also works for other architectures like ARM, MIPS, etc.

CODE

            
[cmdletbinding()]            
Param(            
 [string[]]$ComputerName =$env:ComputerName            
)            
            
$CPUHash = @{0="x86";1="MIPS";2="Alpha";3="PowerPC";5="ARM";6="Itanium-based systems";9="x64"}            
            
            
foreach($Computer in $ComputerName) {            
Write-Verbose "Working on $Computer"            
 try {            
 $OutputObj = New-Object -TypeName PSobject            
 $OutputObj | Add-Member -MemberType NoteProperty -Name ComputerName -Value $Computer.toUpper()            
 $OutputObj | Add-Member -MemberType NoteProperty -Name Architecture -Value "Unknown"            
 $OutputObj | Add-Member -MemberType NoteProperty -Name Status -Value $null            
 if(!(Test-Connection -ComputerName $Computer -Count 1 -quiet)) {            
  throw "HostOffline"            
 }            
    $CPUObj = Get-WMIObject -Class Win32_Processor -ComputerName $Computer -EA Stop            
 $CPUArchitecture = $CPUHash[[int]$CPUObj.Architecture]            
 if($CPUArchitecture) {            
  $OutputObj.Architecture = $CPUArchitecture            
  $OutputObj.Status = "Success"            
 } else {            
  $OutputObj.Architecture = ("Unknown`({0}`)" -f $CPUObj.Architecture)            
  $OutputObj.Status = "Success"            
 }            
 } catch {            
 $OutputObj.Status = "Failed"            
 Write-Verbose "More details on Failure: $_"            
 }            
$OutputObj            
}            

Output:

cpu-architecture

This script is available on technet scripting gallery as well.

{ 0 comments }