≡ Menu

Find current working directory using PowerShell

What is my current working directory? You can easily determine this if you are in a interactive shell, but how to get this information as part of script. This post will provide that information.

There are two ways available to get the current working directory using PowerShell.

Using cmdlets:

Get-Location returns a object that contains the current path information. You can get it using the command shown below.

Get-Location | select -ExpandProperty Path

Using Dotnet class:

There is a dotnet way available as well. System.IO.Directory class provides this information. All you need to do is invoking the GetCurrentDirectory() method.

[System.IO.Directory]::GetCurrentDirectory()            

Which one you like most?

{ 3 comments }

There are several ways available with PowerShell to check and create a new folder at given location using. Combination of Test-Path and New-Item can do this task for you.

However, there is much more easy way available, if you are not bothered to check if the path exists and all you need is a folder there. The [System.IO.Directory] class has a method called CreateDirectory which just a creates a directory if it doesn’t exists. It will not do anything if the folder is already available.

Let us try this now.

[Void][System.IO.Directory]::CreateDirectory("C:\temp")            

Irrespecitve of how many no. of times you are executing the above command, it will never error out. It create the folder for the first time and doesn’t do anything during the subsequent runs because the folder is already avialable.

Hope you like this tip.

{ 0 comments }

Get current UTC time using PowerShell

In this powershell tip post, let us see how to find the current UTC time. There are several ways available to do this but one easy and simple way I found is by  using [System.DateTime] class.

[System.DateTime]::UtcNow

This displays the current UTC date time information. See below screenshot for easy understanding.

UTCTime

Alternatively you can try below code as well.

$datetime = Get-Date            
$datetime.ToUniversalTime()
utctimealternative

Please subscribe to this blog for more such tips.


{ 1 comment }

This post will help in converting System.Security.SecureString created from Read-Host cmdlet to plain text using PowerShell. We generally read passwords using -AsSecureString parameter of Read-Host. Once the password is read, if you want to see what is the password entered by the user, you cannot really see it by printing the variable into which you read the input. If you try that, you will see a screen similar to below.

SecureString

Converting this System.Security.SecureString is made easy with below few lines of code. If you have a application that accepts only plain text passwords then you will find this very useful for conversion purpose.

Using below code first we are reading the password into $SecureString variable and converting it to Plain text using DotNet class.

$SecureString = Read-Host "Enter a password for user account" -AsSecureString            
$BSTR = [System.Runtime.InteropServices.Marshal]::SecureStringToBSTR($SecureString)            
$PlainPassword = [System.Runtime.InteropServices.Marshal]::PtrToStringAuto($BSTR)            
Write-Host "Entered password is $PlainPassword"

Below is a sample output that shows the conversion of secure string to plain text.

SecureStringResolved

Hope this post is helpful.


{ 7 comments }

In this post, you will see various options for extracting folder name from given file or directory path. This is generally useful in many ways as you work more with file and folders.

Let us proceed to see how we can achieve this. For example you have a absolute path c:\temp\abc\myproj1\newdata.txt file and you want to get the parent directory of the newdata.txt from the path string that is given to you. This operation might look simple if you just have one path and what you do if you have to do this for some 10,000 files paths? Obviously a programmatic approach is destination.

My favorite approach is using [System.IO.Path] Class.

[System.IO.Path]::GetDirectoryName("c:\temp\abc\myproj1\newdata.txt")

The GetDirectoryName method takes a path as input and returns the directory name. Alternative to this is using split-path cmdlet that comes with PowerShell. Using this cmdlet is much better than GetDirectoryName method because this cmdlet provides several other features.

What they are?

Like the GetDirectoryName method, it also returns the parent directory

Split-Path "c:\temp\abc\myproj1\newdata.txt"

It verifies if the path exists or not when -Resolve parameter is specified

Split-Path "c:\temp\abc\myproj1\newdata.txt" -Resolve

It can be used to get the file name from path instead of parent directory.

Split-Path "c:\temp\abc\myproj1\newdata.txt" -Leaf

Hope this tip helps you

{ 7 comments }

While connecting Windows Server 2012(or R2) using RDP you might notice error which says “An authentication error occurred. The Local Security Authority cannot be contacted”. In this post we will see how to get rid of this error and have some PowerShell solution so that you can deploy this across to your servers.

Basically this problem happens when RDP configuration on Windows Server 2012 enforces you to use Network Level Authentication(NLA) to connect using RDP client. It is a security feature introduced starting from Windows Vista/Windows Server 2008. You can read more about NLA at https://technet.microsoft.com/en-us/magazine/hh750380.aspx.

While NLA increases security and performance of the server, it prevents clients which doesn’t support NLA or the ones in broken state from connecting via RDP. If you decided to disable NLA, then follow below steps.

On the server where you want to disable NLA to allow RDP connections.

  • Go to Start -> Run -> type “sysdm.cpl” and Press Enter
  • It opens System Properties. Now go to Remote tab
  • Uncheck Allow Connections only from computers running Remote Desktop with Network Level Authentication (recommended) checkbox.
  • Click on Apply and try to RDP again to the server.

It should work without issues this time. Below screenshot shows the option that I am explaining in above steps.

Now you know how to address this error on single server. But how to do it on multiple server or you want to make it part of your build process? There is a way using PowerShell.

The Win32_TSGeneralSetting WMI class in Root\CIMv2\TerminalServices namespace provides a method called SetUserAuthenticationRequired() to enable or disable above check box.

To disable NLA:

$TSObj = Get-WMIObject -Class Win32_TSGeneralSetting -Namespace Root\CIMV2\TerminalServices            
$TSObj.SetUserAuthenticationRequired(0)
RDP-NLA-Disable

To enable NLA:

$TSObj = Get-WMIObject -Class Win32_TSGeneralSetting -Namespace Root\CIMV2\TerminalServices            
$TSObj.SetUserAuthenticationRequired(1)

Above commands enables or disables NLA for RDP on local computer. If you want to perform these actions on remote computer, just use -ComputerName parameter with Get-WMIObject cmdlet.

Like the way we can enable/disable NLA, we can also check what is the current state of it. There is a Property called UserAuthenticationRequried which stores 0 or 1 that indicates it is disabled or enabled respectively.

$TSObj = Get-WMIObject -Class Win32_TSGeneralSetting -Namespace Root\CIMV2\TerminalServices            
$TSObj.UserAuthenticationRequired

Hope this helps.

{ 1 comment }

PowerShell: How to get DNS client Cache

Tip: How to get(or read) DNS client cache using PowerShell.

You know that DNS client caches the results it received from DNS server for the amount of allowed as per the values in DNS Zone. Client refers to this cache first before making a call to DNS server for resolving any record. Sometime this cache goes stale and we need to clear it to get fresh results. If you want to see what is there in local DNS client cache you can run IPCONFIG /displayDNS. This gives the details in plain text.

You can use below PowerShell cmdlet which is part of DNSClient in Windows 8 & Windows server 2012 and above operating systems to read what is there in the cache and the result is in object format which is easy to parse.

Get-DNSClientCache

You can look for cache details of a particular domain by passing it to -Entry parameter.

Get-DnsClientCache -Entry techibee.com
Get-DNSClientCache

Use Get-Help cmdlet to know more about it.

Get-Help Get-DnsClientCache -Detailed

Hope this helps..

{ 3 comments }

This post will discuss about querying DNS Server (Microsoft or Non-Microsoft) using PowerShell for different types of records like A, PTR, MX, NS, and resource records.

Nslookup.exe is a great utility for querying DNS servers. You can connect to server and query records types that you need. Its very useful utility but only problem is it is not flexible to use inside your scripts/automations. If this utility is used inside script, you to parse the text output to extract the details you need. Ideally anything that returns results in object format is very good in programming.

Are you looking for a script to resolve host name to IP and IP to host name using PowerShell, then check this post.

Alternative to nslookup in windows world is querying DNS server using WMI. There are WMI Classes available to query DNS server for various record types. Try below command to get a list of WMI classes that helps you to query and manage DNS running on a Windows Server.

Get-WmiObject -Namespace root\MicrosoftDNS -List

The downside with approach is, it works only for querying windows based DNS servers and this approach absolutely not valid for non Microsoft DNS server like bind. You can read about using these WMI classes using PowerShell at this Hey Scripting Guy post.

This problem is addressed in much better way in Windows 8/Windows Server 2012 with the introduction of Resolve-DNSName cmdlet. Using this cmdlet you can query any kind of DNS server(Microsoft or non-MS) for any record type without requiring any extra privileges and utilities. This cmdlet returns results in object format which is easy to consume within the script.

This cmdlet is part of DNSClient module in Windows 8/Windows Server 2012 or above Operating Systems. You cannot use this module on Windows 7 or any other previous operating systems.

resolve-dnsname-intro

Now let us look at some examples to understand how to query DNS server using this.

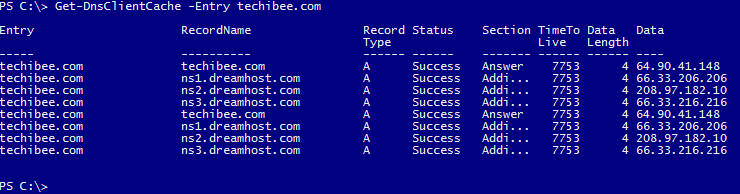
We can query A record techibee.com using below command. This queries the DNS servers that are listed in your network connection configuration. You can get DNS Server IP details of a computer using the script provided in this post.

Resolve-DnsName -Name techibee.com -Type A

resolve-dnsname-queryA
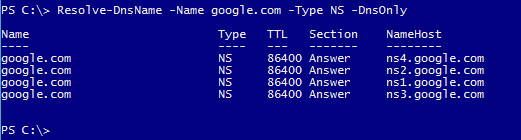
Similarly you can query Name server rescords(NS) of a Domain by passing NS as value to -Type Parameter. This lists all name servers that are hosting the Domain name you are querying. Below examples shows how to query NS records of Google.com

Resolve-DnsName -Name google.com -Type NS -DnsOnly
resolve-dnsname-queryNS

We can target these queries against any DNS server in your network. For example, we can query Google name servers directly for a record or internal DNS server for records. Below command shows how to query a DNS server directly instead of relying on what is configured in local computer network configuration.

Resolve-DnsName -Name techibee.com -Type A -Server 202.156.1.16
resolve-dnsname-queryA2

In above example, 202.156.1.16 is the IP of Google DNS server. You can try giving your internal DNS server name/IP or any external DNS name. It works same way as NSLookup does.

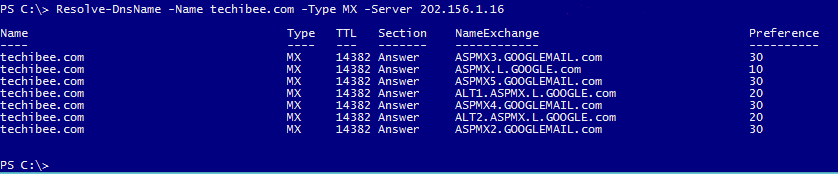
Similarly you can query MX records of a domain using below command.

Resolve-DnsName -Name techibee.com -Type MX -Server 202.156.1.16
resolve-dnsname-queryMX

You might be wondering what all types of records you can query using this cmdlet. Below is the list of records that this cmdlet supports.

If you have any questions about using this cmdlet, please write it in comments section.

Source : TechNet

Record Name
A_AAAA
A
AAAA
NS
MX
MD
MF
CNAME
SOA
MB
MG
MR
NULL
WKS
PTR
HINFO
MINFO
TXT
RP
AFSDB
X25
ISDN
RT
SRV
DNAME
OPT
DS
RRSIG
NSEC
DNSKEY
DHCID
NSEC3
NSEC3PARAM
ANY
ALL

Hope this helps….

{ 6 comments }

This post helps you to understand how to get Windows 10 upgrade notification on Windows 8 or Windows 7 computers.

As you might already aware, Microsoft announced free upgrade to Windows 10 for customers who are already running windows 8 or windows 7. There are some pre-requisites which your computer should meet in order to get this free upgrade. Let us take a look at them and also understand how to register for the free upgrade if your computer OS meeting the pre-requisites.

You should be running with one of the blow operating systems in order to get free Windows 10 upgrade.

  • Windows 8.1
  • Windows 7 SP1

Have you noticed the above properly? Yes, you should have Windows 8.1(not Windows 8) to get free upgrade. If your computer is running windows 8, you can upgrade it to windows 8.1 without any additional cost. There are many articles in web which can help you for this upgrade. Take a look at http://windows.microsoft.com/en-sg/windows-8/update-from-windows-8-tutorial link which covers most of the information.

Similarly you should have SP1 installed if your Computer is running Windows 7.

Once you meet the above pre-requisites, your computer is ready for registering to free Windows 10 upgrade. If you Windows update is running on your computer and it has internet connectivity, by this time you might have already noticed below type of icon in your system tray.

upgradelogoIn case you are not seeing something similar to this, then you must ensure your system is up to date with Windows Updates. Your computer must have Windows RT 8.1, Windows 8.1, and Windows Server 2012 R2 update: April 2014 (KB2919355) update installed which is pre-requisite for actual update that installs the icon in System tray. If this is already available, then look for Update enables additional capabilities for Windows Update notifications in Windows 8.1 and Windows 7 SP1 (KB3035583)which installs this system tray icon which helps in registering for free Windows 10.

Once you start noticing above icon in System tray, registering for the Windows 10 is straight forward. Just click on the icon in System tray and it opens up below window.

Register-windows10

Click on Reserve your free upgrade to complete the registration.

When I clicked on it, it didn’t give me any confirmation about the registration. So, I right clicked on upgrade icon in system tray and went to Check Your Upgrade Status and it gave me below window which confirmed my upgrade registration.

Confirm-Windows10-registration

Optionally you can enter your email address here and click on Send confirmation you have a email confirmation sent about Free Windows 10 Upgrade.

As you can read from the upgrade registration window, the upgrade will be made available from July 29th onwards through Windows update. Make sure you have sufficient bandwidth to download the update. It is expected to around 3GB.

I will make a followup post after July 29th once my computer is upgraded. If you have any questions about how this upgrade, please feel free to write in comments section. I will get back when I get chance.


{ 0 comments }

Recently a friend asked me a question. He has two text files with names in it. He want to have names from first text file copied to first column in CSV and contents of second text file copied to second column in CSV. This post talks about how to achieve this using PowerShell.

Below screenshot shows how the text file contents looks like and how the output CSV file will be.

sampleoutput

First read the contents of text files into variables.

$firstnames = Get-Content C:\temp\firstnames.txt            
$Lastnames = Get-Content C:\temp\lastnames.txt            

Find out which text file has more no. of lines/entries in it. This number tells us how many no. of times we need to loop through to process all items in the text files.

$maxcount = 0            
if($firstnames.count -gt $Lastnames.Count) {            
    $maxcount = $firstnames.count            
} else {            
    $maxcount = $lastnames.Count            
}

Now loop through the contents and save the details to CSV file.

$outputfilename = "c:\temp\namesoutput.csv"            
Add-Content -Path $outputfilename -Value "FirstName,LastName"            
            
for($i=0;$i -lt $maxcount; $i++) {            
    $value = "{0},{1}" -f $firstnames[$i],$lastnames[$i]            
    Add-Content -Path $outputfilename -Value $value            
}

The output file, c:\temp\namesoutput.csv contains the desired output.

Below is a small function that combines all above code pieces and makes the usage generic. You can change the name of output file as you need and names of the CSV columns. I kept them as Column1Name & Column2Name.

function Merge-TextFilesToCSV {            
[CmdletBinding()]            
Param(            
    [parameter(mandatory=$true)]            
    [string]$File1,            
    [parameter(mandatory=$true)]            
    [string]$File2            
)            
    $outputfilename = "c:\temp\megedoutput.csv"            
    $File1Contents = Get-Content $File1            
    $File2Contents = Get-Content $File2            
            
    $maxcount = 0            
    if($File1Contents.count -gt $File2Contents.Count) {            
        $maxcount = $File1Contents.count            
    } else {            
        $maxcount = $File2Contents.Count            
    }            
            
                
    Add-Content -Path $outputfilename -Value "Column1Name,Column2Name"            
            
    for($i=0;$i -lt $maxcount; $i++) {            
        $value = "{0},{1}" -f $File1Contents[$i],$File2Contents[$i]            
        Add-Content -Path $outputfilename -Value $value            
    }            
            
    Write-Host "Output available at $outputfilename"            
}

Copy past the above function into PowerShell window and run it as shown below.

mergecsv

Output shows the name of the output file.

{ 4 comments }