≡ Menu

C# typeof equivalent in PowerShell

Those who are good with C# knows what typeof does. Basically is used for finding the type data of a given variable or object. How do we do this when it comes to PowerShell? Is there any equivalent keyword for typeof in PowerShell? Let us find out.

PowerShell implements typeof in little different way. Instead of using the typeof keyword like in C#, the PowerShell provides a method called GetType() for each variable or object to find its type. For example, if you want to find data type of a variable called $username, you can know it by calling $username.gettype().

$username = “techibee”

$username.GetType()

PowerShell Typeof equivalent

You can also check if the returned type is a string, integer or some other data type by comparing it as shown below.

$username = “techibee”

$username.GetType() -eq [string]

$age = 12

$age.GetType() -eq [int32]

$age.GetType() -eq [string]

PowerShell typeof

Do you know any other case where PowerShell’s Gettype() cannot replace typeof keyword in C#? Please post in comments section.

{ 3 comments }

With the increase in use of Windows 10 operating system, you may want to find out how many Windows 10 computers are currently added to your Active Directory Domain. This code snippet will help you to query this information and export it to excel or CSV.

Get-ADComputer cmdlet in ActiveDirectory module is used for querying Computer account details and we can use it to query Windows 10 installations as well. It queries all computers that containing any version of Windows 10 Operating system.

Import-Module ActiveDirectory

Get-ADComputer -Filter { OperatingSystem -like “Windows 10*” } -Properties OperatingSystem

This code needs ActiveDirectory PowerShell  module. You can also try exporting it to CSV by piping the output to Export-CSV cmdlet.

Import-Module ActiveDirectory

Get-ADComputer -Filter { OperatingSystem -like “Windows 10*” } -Properties OperatingSystem | Export-Csv c:\temp\windows10comps.csv -NoTypeInformation

You will see the output recorded in c:\temp\windows10comps.csv file.

{ 0 comments }

Reversing a array using PowerShell

Array is a collection of items. Sometimes we needed to reverse or inverse a array collection. There are many approaches available in PowerShell for doing the reverse or inverse operations but the approach talked in this article is most easiest one.

Reversing String Array using PowerShell

The [Array] accelerator in PowerShell has a static method called reverse() which can be used to reverse a array. This method really doesn’t distinguish whether it is string array, number array or any other kind of array. All it does is reversing it. Though array type is not a matter, I have given a examples for each array type below for better understanding.

$StringArray = @(“abc”,“xyz”,“thn”)

$StringArray

[array]::Reverse($StringArray)

$StringArray

Reversing String Array

Reversing String Array

Reversing numeric array using PowerShell

Below is a example for reversing a numeric array using PowerShell.

$numbericarray = @(1,2,4,3,6,9,7)

$numbericarray

[array]::Reverse($numbericarray)

$numbericarray

Reversing Numeric array

Reversing Numeric array

Reversing Characters array using PowerShell

Below example is for reversing a characters array. Approach is similar to reversing number or string based arrays.

$chararray = @(‘a’,‘c’,‘g’,‘d’,‘r’)

$chararray

[array]::Reverse($chararray)

$chararray


Reversing Char array

Reversing Char array

Hope this article helps.


{ 4 comments }

PowerShell -eq, -ceq and -ieq Comparison Operators

This article helps you in understanding -eq, -ceq, -ieq Comparison operators in Windows PowerShell which is used for comparison purpose. The usage examples of PowerShell -eq operator in this article gives a better understanding of its usage.

Summary

Windows PowerShell is one of the great shells that Microsoft ever designed & developed. With help of PowerShell Windows Administrators and developers are benefited a lot as it simplifies the automation in Windows Operating System. You can read more about PowerShell and its uses from TechNet site.

Since the scope of this article is to know more about PowerShell -eq operator, let us start looking at it.

The comparison operator (-eq):

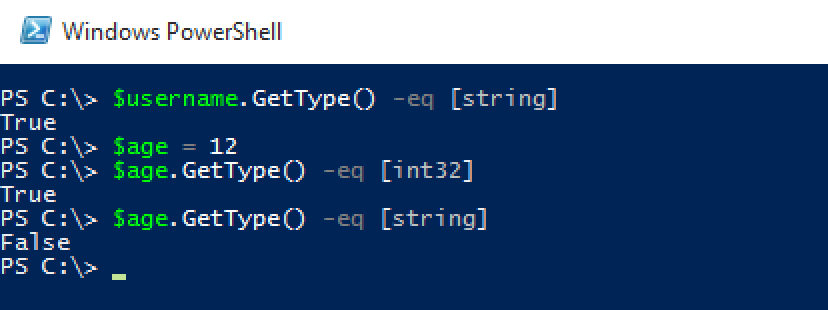
PowerShell is like any other programming language. While developing scripts using PowerShell we need to make use of operators. The -eq (called as equal) operator is one of them. As the name indicates the purpose of this -eq operator is to perform comparison in PowerShell. We can compare strings, numbers and characters using -eq operator. This operator is used for comparing scalar values. The output this -eq operator is a Boolean value(True or False) which indicates whether the input scalar values are equal or not.

Examples:

Now let us look at some examples to understand how to use this -eq operator in Windows PowerShell for comparison purpose.

String Comparison:

Two strings can be compared using -eq operator in PowerShell to verify if they are equal or not.

“abc” -eq “abc”

“abc” -eq “xyz”

string-comparison-1

The above code is comparing one string with another and returning True or False based on whether strings are equal or not. You will have to do this many times while writing PowerShell scripts based on your requirements.

Look at the below example where PowerShell -eq operator is used to determine if the user has entered correct PIN number or not.

$UserPIN = Read-Host “Enter your Name”

if($UserPIN -eq “Steve”) {

Write-Host “Welcome Steve!!”

} else {

Write-Host “Sorry $UserPIN, only Steve is allowed”

}

String-Comparision-2

This -eq operator in PowerShell can accept collections type of variables as well but the use cases of it are less and I don’t want to create confusion by discussing it here.

 Numeric Comparison:

Like the way the -eq operator used for string comparison, it can compare number values as well. Look at the below examples.

100 -eq 100

100 -eq 110

0100 -eq 100

10.1 -eq 10.1

10.2 -eq 10.1

numeric-comparison-1

It compared both the operands passed to it and returned the result. You might wonder how it knows if the operands passed to -eq operator are strings or numeric values. That is the beauty of PowerShell. It is capable of understanding the variable type and then perform the comparison.

Also you might have noticed that -eq is capable of comparing decimal number as well.

Character Comparison:

Character comparison in PowerShell is similar to String or numeric comparison. You can compare two characters using -eq operator to verify if they are equal or not.

‘c’ -eq ‘c’

‘c’ -eq ‘z’

See above example for character comparison. If both characters are equal then it returns True otherwise False.

character-comparison-1

Case-sensitive and Case-insensitive Comparison:

So far all the examples we have seen above are case-insensitive comparisons. Yes, PowerShell -eq operator is designed to perform case insensitive comparison operators. But your PowerShell script requirements might need case sensitive comparisons as well for exact string comparison.

To address such needs, PowerShell has two more operators for string comparison.

  1. Case-Sensitive Comparison (-ceq)
  2. Case-Insensitive Comparison (-ieq)

Case-Sensitive Comparison (-ceq):

This operator works similar to -eq operator but returns false if the strings being compared are different by case. For example, it returns false when you try to compare Windows with windows. Because the first term is having W in capital.

See below example to see how it works:

“Windows” -eq “windows”

“Windows” -ceq “windows”

case-sensitive-compare

Case-Insensitive comparison (-ieq):

Even though the -eq operator performs string comparison in case-insensitive way, you still want to ensure a case insensitive comparison, you can use -ieq. The usage of this parameter is very less because most people use -eq which does the same thing. If you know any case where -ieq is preferred over the -eq, please post in the comments of this article so that I will get it added here.

Below is a small example that shows the case-insensitive comparison of strings.

“linux” -eq “Linux”

“linux” -ieq “Linux”

“linux” -ceq “Linux”

case-insensitive-compare

The case insensitive compare(-ieq) and the regular compare operator(-eq) returned True in both the cases. But the case sensitive(-ceq) compare returned False.

This case insensitive or sensitive kind of operators are applicable only for Strings and Characters. The numeric values don’t have any case so using -eq operator alone is sufficient.

Do you have any questions about using any of these -eq, -ceq, or -ieq operators? Feel free to post it in comments section below this article.

{ 0 comments }

Get SID of a User account using PowerShell

System administrators want to find SID of user account for troubleshooting purpose and other requirement. In this post let us see how to resolve a user account to SID using PowerShell.

PsGetSid is one of the favorite utility for Windows Server administrators for resolving user names to SID. There are otherways to do this as well. One of the ways is using System.Security.Principal namespace. The script below is based on the classes in this name space. You can check this TechNet page to understand more about its usage using PowerShell.

Save the below code as Get-UserSID.ps1 and then it is ready for usage. Look at the below usage examples.

[CmdletBinding()]            
Param(            
    [Alias("User","UserName","Identity")]            
    [string[]]$UserAccount,            
    [string]$DomainName = $env:USERDOMAIN            
)            
            
foreach($User in $UserAccount) {            
 $object = New-Object –TypeName PSObject –Prop (            
                @{'UserName'=$null;            
                'DomainName'=$null;            
                'SIDValue'=$null}            
                )            
            
 $Object.UserName = $User.ToUpper()            
 $Object.DomainName = $DomainName.ToUpper()            
 try {            
     $UserObject = [System.Security.Principal.NTAccount]::new($DomainName,$User)            
     $out = $UserObject.Translate([System.Security.Principal.SecurityIdentifier])            
  $Object.SIDValue = $out.Value            
             
 } catch {            
  $Object.SIDValue = "FAILED"            
 }            
$Object            
}            

Example#1: Resolve a single user account name to SID

.\Get-UserSID.ps1 -UserAccount testuser21
get-usersid-1

Example#2: Resolve multiple user accounts to get their SIDs

.\Get-UserSID.ps1 -UserAccount testuser21,testuser22
get-usersid-2

Example#3: Get SID of a user account from a domain other than current logged on user domain

.\Get-UserSID.ps1 -UserAccount testuser21,testuser1 -DomainName winops.com
get-usersid-3

This script is a good alternative for psgetsid.exe utility and can be incorporated into any of your scripts to get a user account’s SID details.

Do you have any questions about the usage? Feel free to post it in comments section.

{ 2 comments }

In previous post we have seen how to get SID of current logged on user account using PowerShell. In this post, I will show you how to find if the current logged user account is a local account or a Domain level account.

Related Posts

This previous post we have used UserPrincipal class to get the current logged details. In this post we will use the object returned from this and find out if the user account is local user account or Domain User.

First let us get the details of UserPrincipal into a variable. Don’t forget to load the assembly before accessing AccountManagement namespace.

Add-Type -AssemblyName System.DirectoryServices.AccountManagement            
$UserPrincipal = [System.DirectoryServices.AccountManagement.UserPrincipal]::Current

One of the properties of the returned object is ContextType which contains the details we are looking for. If the value of this property is Domain then the user account is a domain account. The value will be Machine if the account is a local user account.

$UserPrincipal.ContextType

We can write a small wrapper around this and make a small function that can be reused in any script. This function returns either DomainUser or LocalUser string based on the account type.

Function Get-CurrentUserType {            
[CmdletBinding()]            
Param(            
)            
            
#Import Assembly            
            
Add-Type -AssemblyName System.DirectoryServices.AccountManagement            
$UserPrincipal = [System.DirectoryServices.AccountManagement.UserPrincipal]::Current            
if($UserPrincipal.ContextType -eq "Machine") {            
    return "LocalUser"            
} elseif($UserPrincipal.ContextType -eq "Domain") {            
    return "DomainUser"            
}            
}            
            

Copy this function into PowerShell window and invoke the function to see the results.

get user account type

Do you have any questions about this approach? Write it in comments section.

{ 0 comments }

One of the things I like with PowerShell is its ability to use DotNet classes and methods. In this article we will such approach to find out what is the SID of current logged on user account using PowerShell.

DotNet assembly System.DirectoryServices.AccountManagement has a class called UserPrincipal which gives a simple way to get SID of current logged user. There are several other ways to do it but I found this is easiest of all.

Let see how to do this. First we need to add the System.DirectoryServices.AccountManagement assembly to PowerShell session. You can do it by Add-Type cmdlet.

Add-Type -AssemblyName System.DirectoryServices.AccountManagement

Once the assembly added, you can use below one-liner to query the Current User details and one of the property is SID.

[System.DirectoryServices.AccountManagement.UserPrincipal]::Current

Below screen shows the list of properties that this class provides.

current sid

Putting all these together, I made a quick PowerShell function that returns the SID of current logged on user.

function Get-CurrentUserSID {            
[CmdletBinding()]            
param(            
)            
            
Add-Type -AssemblyName System.DirectoryServices.AccountManagement            
return ([System.DirectoryServices.AccountManagement.UserPrincipal]::Current).SID.Value            
            
            
}

You can import this function into your PowerShell window and use it. Let me know if you got any questions.

{ 15 comments }

Every OS X user already new that Apple has released a new version of OS X with the name EI Captain. One of the new features in this version of Mac OS is split screen view that Mac users are waiting for long time. This post is for demonstrating how to start split screen view in Mac Book after the upgrade.


To start the Split Screen view:

  • First select a application that you want to be part of Split screen view. I have chosen Safari browser as one. Now click and HOLD the Maximize button at the left right top corner till you see a view similar to below.
maximize mac-split-screen-first-app
  • Keep holding the button and move to either left or right depending on where you want to place the first application in your split screen view. You can easily identify the gray areas shown on the screen which indicates that your application will be part of the split view. I have chosen to place it on left hand side.
  • Now at the other side of the screen you see the list of apps that are currently opened in your computer. You can select the app you need and it will occupy the self half portion in split screen
mac-split-screen-second-app
  • After that your screen will look like below. Now can enjoy writing a document while watching a movie 🙂
mac-split-screen
  • You can choose to adjust the size of split portion by selecting the area between the two application. Your mouse icon changes to show that you can resize.
split-screen-resize

To Exit the split view:

Exiting split view is simple. Move the mouse to top side of the screen and click the minimizer button (green one, again) to come back to normal desktop

Hope this article helps.

{ 0 comments }

When you login with built-in administrator and open Microsoft Edge(new browser that replaces internet explorer), you may notice below error message.
This app can’t open
Microsoft Edge can’t be opened using Built-in Administrator account. Sign in different account and try again.

Screen Shot 2015-10-06 at 11.12.55 pm

Resolution:

The resolution to this problem is disabling this security setting from local policies. Follow the below steps to resolve it.

  • Open gpmcedit.msc
  • Navigate to Computer Configuration -> Windows Settings -> Security Settings -> Local Policies -> Security Options
  • Open User Access Control : Admin Approval Mode for the Built-in Administrator account policy and enable it.
  • Click Apply & OK to save the change
  • Reboot your computer
Screen Shot 2015-10-06 at 11.22.42 pm

After restart, login with administrator account again and you can start browsing using Microsoft Edge.

{ 8 comments }

In this article, let us see force local or remote computer to register its IP address in DNS using PowerShell. The native way of doing it is ipconfig /registerdns. The disadvantage with this is it cannot be used for triggering dns registration on remote computers.

There is a cmdlet called Register-DNSClient in DNSClient module which comes by default with Windows Server 2012/Windows 8 or above operation systems. The good thing with this cmdlet is it can be used for forcing remote clients to register dns.

First let us see how to force the local computer to register its DNS records.

Register-DnsClient            

Running above cmdlet from a PowerShell prompt will initiate the registration process.

If you want to perform similar operation against a remote computer, then you can use CimSession to trigger this.

$Computername = "TIBDC01"            
([WMIClass]"\\$ComputerName\ROOT\CImv2:Win32_Process").Create("cmd.exe /c ipconfig /registerdns")

This procedure works for Windows Server 2012/Windows 8 or later operating system. However if your remote computer is lower version than aforementioned versions, then you can use Get-WMIObject cmdlet to trigger this remotely.

This WMI approach works for any of the windows operating systems.

$session = New-CimSession -ComputerName TIBDC01            
Register-DnsClient -CimSession $session            

This way you can force the registration of DNS on any remote windows computer using PowerShell.

{ 3 comments }